1 / 11Use ← → to flip
Responding to Workplace Violence: Train-the-Trainer Module 7: Tools of Engagement
Trainer manual chapter for the Responding to Workplace Violence course.
Page text
· 11 pages · by Summa Health
The words on each page as the author wrote them, read from the file by software so they can be searched. Layout, pictures and tables are not shown here: the pages above and the download are the original.
- Page 1
Responding to Workplace Violence in Healthcare: Train-the-trainer
- Module 7: Tools of Engagement
- I.
- Objectives
- Instructors will learn a selection of physical engagement techniques to be presented in class. Instructors will review options for instruction, either live or via videotape, and consider which is most appropriate for their facility.
- II.
- Introduction
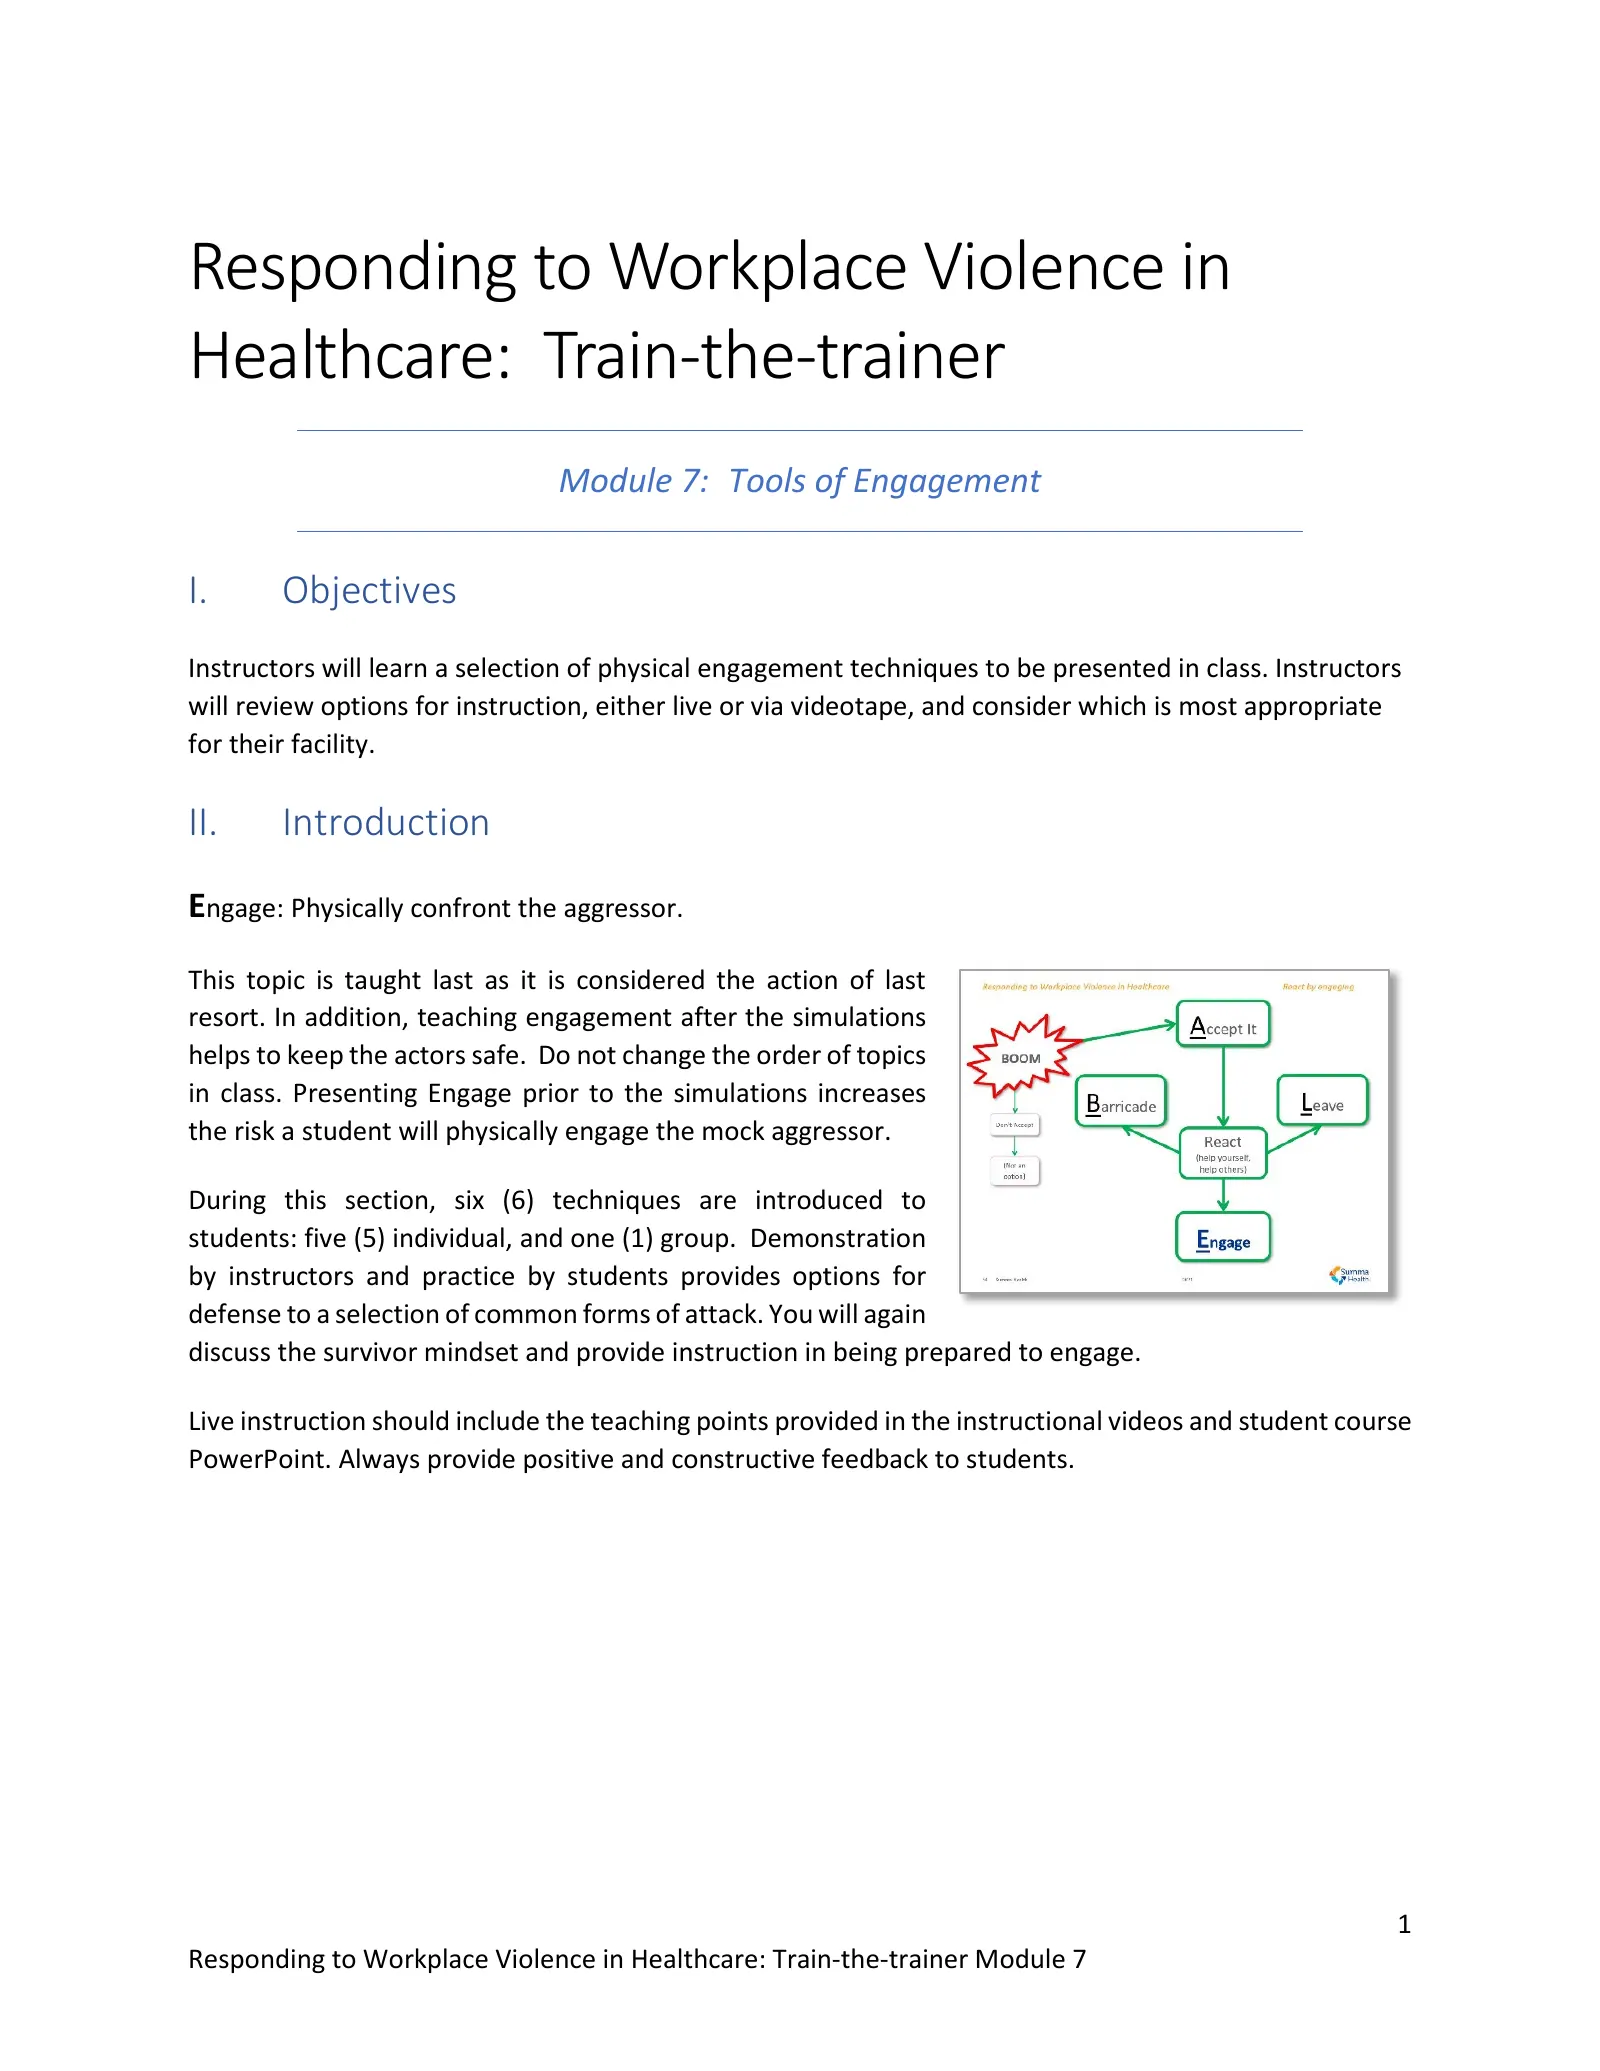
- E ngage: Physically confront the aggressor.
- This topic is taught last as it is considered the action of last resort. In addition, teaching engagement after the simulations helps to keep the actors safe. Do not change the order of topics in class. Presenting Engage prior to the simulations increases the risk a student will physically engage the mock aggressor.
- During this section, six (6) techniques are introduced to students: five (5) individual, and one (1) group. Demonstration by instructors and practice by students provides options for defense to a selection of common forms of attack. You will again discuss the survivor mindset and provide instruction in being prepared to engage.
- Live instruction should include the teaching points provided in the instructional videos and student course PowerPoint. Always provide positive and constructive feedback to students.
- Page 2
Tools of Engagement:
- Individual
- General defense: Hammer Strike
- Wrist Grab: Snake and the Vine
- Hair Pull: Be a Ballerina
- Front Choke: Major League Pitcher
- Rear Choke: Squash the Bug
- Group
- Armed Aggressor: The Swarm
- These defense techniques are taught by instructors and can be practiced by students individually, in pairs, and as a group. Working individually includes students envisioning an aggressor’s grab and then mimicking the defense. Students working in pairs will (gently) “mock” the grab and the technique. Care must be taken to ensure no student inadvertently causes injury. Video instruction is provided for instructors and is suitable for in class viewing if instructors prefer.
- Instructors, or the video, will demonstrate each technique. Following each technique is closely supervised practice with instructors providing constructive feedback to students on their technique.
- “It’s not the way . . . it’s A way.”
- The techniques included were selected as they are generally easier to learn responses to defend against the most common forms of attack. There are other ways, but these are what is taught in this course.
- NOTE: Continue your observation of students for signs of trauma. Just because a student has not shown any signs of trauma in class, so far, does not mean they will not in this last section.
- Page 3
- III.
- Choice of Defense Instruction
- Instructors have varying levels of comfort and experience with teaching self-defense. As such, videos are provided for this instruction. The videos may be used to help train instructors in teaching these techniques in addition to inclusion in the student course. If you are comfortable teaching a technique and prefer to teach it live, simply click past the video. If you prefer, you may use the video instruction provided to teach this section. You can also use a mix of video instruction and live instruction.
- With either approach, you can pair students to simulate the attacks and practice the responses/actions. Remind students to go slowly and be careful with their partner so as to not cause injury. Continually monitor students to ensure proper technique and safety. Student may also just watch, or practice “in the air”, rather than be paired with another student for practice. Visualizing the type of attack and physically moving through the actions is an effective training method and is used for training and muscle memory.
- NOTE: As with earlier participation, remind students that active participation is optional based on their comfort level.
- IV.
- Individual Defensive Techniques
- Watch the following videos to see how each individual technique is taught. Talking points are provided in both the videos and with each slide in the student course PowerPoint. When pairing students for practice, place students of approximately the same size together whenever possible.
- Page 4
- A.
- Hammer Strike
- Live instruction should include the teaching points provided in the instructional videos and student course PowerPoint.
- Always provide positive and constructive feedback to students.
- The following video provides instruction in performing a hammer strike. Click the link below to access the video.
- Click here to access Video 20- Tools to Engage: Strikes - Hammer Fist
- A bladed stance is a sideways chest forward stance that provides increased protection by limiting exposure to the torso. It also allows for quicker movements forward and back as well as side to side. Teach students to take a bladed stance when possible whenever stable footing and protection is needed.
- If strike pad(s) are available, students can line up and each can practice the hammer strike. Watch the student’s strike and provide any correction needed to assist them in completing their most optimal strike. Allow for as much practice as time permits. If pads are not available, have the students “air practice”. In the future, consider a purchase of strike pads to enhance the realism of the student experience. Larger pads are preferred as they provide a large target to strike, thereby minimizing a student missing the pad potentially causing injury.
- Watch the student’s technique and provide any correction needed to assist them in completing their most optimal technique. Focus on the mechanics of the technique and guide students accordingly. Provide positive and constructive feedback to students.
- B.
- Wrist Grab
- The following video provides instruction in performing the wrist grab defense. Click the link below to access the video.
- Click here to access Video 21- Tools to Engage: Wrist Grab – Snake and the Vine
- Page 5
- Watch the student’s technique and provide any correction needed to assist them in completing their most optimal technique. Focus on the mechanics of the technique and guide students accordingly. Provide positive and constructive feedback to students.
- C.
- Hair Pull
- Live instruction should include the teaching points provided in the instructional videos and student course PowerPoint.
- Always provide positive and constructive feedback to students.
- The following video provides instruction in performing the hair pull defense. Click the link below to access the video.
- Click here to access Video 22- Tools to Engage: Hair Pull – Be a Ballerina
- D.
- Front Choke
- The following video provides instruction in performing the front choke defense. Click the link below to access the video.
- Click here to access Video 23- Tools to Engage: Front Choke – Major League Pitcher
- Page 6
- E.
- Rear Choke
- Live instruction should include the teaching points provided in the instructional videos and student course PowerPoint.
- Always provide positive and constructive feedback to students.
- The following video provides instruction in performing the rear choke defense. Click the link below to access the video.
- Click here to access Video 24- Tools to Engage: Rear Choke – Squash the Bug
- Watch the student’s technique and provide any correction needed to assist them in completing their most optimal technique. Focus on the mechanics of the technique and guide students accordingly. Provide positive and constructive feedback to students.
- V.
- Group Defensive Technique
- A.
- The Swarm Maneuver
- The Swarm Maneuver can be used with an armed or unarmed aggressor when there are no other viable options. The idea of being a part of The Swarm Maneuver may be intimidating for many students. Providing students detailed information on why a distraction works, how to create a distraction, and time to practice the technique is beneficial in helping to alleviate concerns. Be sure students understand that being a part of The Swarm, either in class or in real life, is completely voluntary. However, it may also be a matter of survival.
- Prior to teaching and practicing the swarm maneuver technique, instructors will present information on shooting accuracy and why distractions are used to initiate the swarming of an armed aggressor.
- Page 7
The Swarm: Demonstration
- The following video provides a demonstration of The Swarm Maneuver. Click the link below to access the video.
- Click here to access Video 25- SIMULATION Swarm Maneuver Demonstration
- The Swarm is a simple and effective tactic for controlling an aggressor.
- Creating a distraction and how it works
- Creating a distraction is designed to give you the opportunity to either Leave or Engage. These are your ONLY two options when creating a distraction but can also provide others not involved in the distraction more time to Barricade. Teaching students about how the distraction is an effective tool can be done by the instructor (preferred), or by using the video provided. The Swarm is most easily accomplished with multiple people; however, it can be done to some extent with one or two.
- You will need a plastic gun with a functional laser or use the video provided for this instruction.
- The following video provides instruction in how and why throwing objects at an aggressor’s head creates an important distraction, especially if armed. Click the link below to access the video.
- Click here to access Video 26- Distraction . . . What Causes a Reaction
- It is important to ensure students know it may be necessary to use work items to create a distraction. Authority or permission must be given to employees and employees must, in turn, give themselves permission to use facility equipment as the distraction in any crisis situation.
- Page 8
Teaching The Swarm
- When teaching The Swarm, allow students to practice the technique in separate stages and finish up by letting them run through the technique from start to finish.
- The Swarm Stages:
- Distraction
- Controlling the arms
- Dropping weight to ground
- Controlling the legs and head
- Controlling the weapon
- When practicing this technique, keep safety and effectiveness in mind. Ask students to volunteer and let them know what to expect. Certain medical conditions may make participation ill-advised (e.g., knee or back issues, etc.).
- The following video provides a demonstration of The Swarm Maneuver instruction. Click the link below to access the video.
- Click here to access Video 27- Tools to Engage: Weapon - Swarm Maneuver
- The video provides for continuous movement for demonstration purposes. When instructing in class, care must be taken to protect students and instructors from injury.
- Page 9
Protecting participants from injury:
- When practicing “drop weight and take down to floor”, simulate the “drop” to ensure instructor and student safety.
- After students secure the arms, “freeze” the action, move carefully to the ground, and then “unfreeze” the action to continue immobilizing the aggressor.
- NOTE: When practicing The Swarm, have anyone participating remove anything that may break or cause injury such as cell phones, pens, watches, ID badges, etc.
- The following video provides additional instruction in how to safely teach The Swarm Maneuver instruction. Click the link below to access the video.
- Click here to access Video 28- Swarm Maneuver: The Finer Points
- Securing the Weapon
- A teaching point provided in the video deals with securing the weapon.
- Ask your students if they noticed anything in the video they would have done differently? Securing the weapon should be done if can be done safely.
- Tips on securing the weapon:
- Avoid contact with the dangerous areas (e.g., trigger area (gun) and sharp edges (knife).
- Pick up by the handle/grip or “butt” of the gun.
- Do not point towards anyone when picking up or moving.
- Place weapon in a secure place (e.g., waste basket) and remove from area.
- NOTE: DO NOT KICK THE GUN as kicking could cause the firearm to discharge.
- Page 10
- The universal indication to law enforcement that you are in possession of the aggressor’s weapon is to hold the waste backet in front of you why showing your empty hands. In the event a gun is present, and bystanders lack the comfort to pick up and place in basket, they can turn over a waste basket and place over the weapon. A bystander would then sit on the waste basket which also indicates to law enforcement that the weapon is secure within. Any bag or box can be used to secure the weapon until the police arrive. The most important need is to get the weapon away from the aggressor.
- What can be used as a distraction?
- Ask students to think about the area they work in. Lead students in a brainstorming session listing many options.
- What is readily accessible at work that they could throw at the head of an armed aggressor?
- Mug
- Stapler
- Book
- Calculator
- Laptop
- Medical Equipment
- Anything moveable and light enough to throw
- What about at home or when out shopping?
- Goods from the store
- VI.
- Last Up: Review and Resources
- Module 8 wraps up the course with a brief review and informational checklists to get you started on your journey to offer the Responding to Workplace Violence in Healthcare student course at your facility.
- Last up . . .
- Page 11
- This material was produced under grant number SH-05150-SH9 awarded to Summa Health from the Occupational Safety and Health Administration, U.S. Department of Labor. It does not necessarily reflect the views or policies of the U.S. Department of Labor, nor does mention of trade names, commercial products, or organizations imply endorsement by the U.S. Government.
More on Workplace Violence
pdf
2 slidesWorkplace Violence Fact Sheet (OSHA FS-3509)
OSHA fact sheet or bulletin, for General Industry classes.
U.S. Department of Labor, OSHAPublic domain
pdfes
2 slidesWorkplace Violence Fact Sheet (OSHA FS-3524) (en español)
OSHA fact sheet or bulletin, in Spanish, for General Industry classes.
U.S. Department of Labor, OSHAPublic domain
pdf
60 slidesWorkplace Violence: Guidelines for Preventing Workplace Violence for Healthcare and Social Service Workers (OSHA 3148)
OSHA booklet, for General Industry classes.
U.S. Department of Labor, OSHAPublic domain